

How To Mach Paint On A Wall Repair
Preparing Walls for Painting: Problem Walls
Updated: May 21, 2022
Ready any wall earlier you paint to become a super-smooth terminate

We show you how to fix common wall flaws and make them perfectly polish earlier you paint. You'll save the $200 expense of hiring a pro.
You might also similar: TBD
Highlight hidden wall flaws

Highlight wall flaws
Highlight difficult-to-see flaws with a strong calorie-free. The shadows bandage by small bumps and dents are easy to spot.
Minor wall flaws are often hard to spot—until the afternoon sunday hits them and makes them embarrassingly obvious. Detect and mark whatever imperfections in the walls. First by turning off all the lights in the room and endmost the curtains. Then hold a problem light next to the wall and move information technology across the surface (a procedure chosen "raking").
Wherever the lite highlights a problem, fifty-fifty a small one, stick a piece of tape side by side to information technology so you lot can easily find it when you come through with spackling or joint compound. Tape works better than circling the bug with a pencil or pen (which tin drain through the pigment).
Video: How to Prep and Paint a Room
We'll show you how to prep and paint the walls in whatever room in only one morning – including all that messy clean-up. Your results will rival any painting job washed past a pro.
Fix nail pops on walls forever

Pull popped nails
Bulldoze a screw nearby. Then pry out the protruding nail, protecting the wall with a putty knife.
Seasonal expansion and contraction of studs tin push nails out of the drywall. You can't only resink the blast and apply joint chemical compound over the top—the smash volition pop back out. To permanently fix a popped smash, drive a drywall screw well-nigh 2 in. above or below the popped nail. Use a 1-1/4-in. screw (screws hold amend than nails). A longer spiral isn't better—information technology's actually more probable to pop out than a shorter one.
Now pull out the smash, holding a broad putty pocketknife under your pry bar to protect the wall. Tap the empty nail hole with the putty knife handle to knock protruding drywall fragments into the wall (or you won't go a smoothen coat of filler on the wall). Finally, embrace the screw head and fill the nail pigsty with three coats of articulation chemical compound.
Seal torn paper

Seal tears before applying compound
Prime torn paper edges, sand and and so apply joint compound to smooth and hide the flaw.
The dorsum of a chair, a flying video game remote or an aggressive kid with a toy truck tin can tear the drywall paper face. A coat of paint or joint compound over torn paper will create a fuzzy texture. For a smooth finish, seal the torn paper. First by cutting away whatsoever loose paper. Then seal the exposed drywall with a stain-blocking primer. This keeps the drywall from arresting wet from the shortly-to-be-practical articulation compound. Look for the primer to dry, then sand the exposed drywall edges to remove newspaper nubs. Embrace the gouge with a sparse layer of joint chemical compound, feathering it out along the wall. If necessary, apply a second coat, feathering it also, and then await for it to dry and sand it smooth.
Tip: Subsequently applying articulation compound, exist sure to cover it with primer before painting to prevent "flashing." Flashing occurs when articulation compound absorbs the paint, dulling the end.
Tape and make full damaged corners

Photo 1: Reshape aptitude metal corner bead
Shape the corner bead with a hammer until it's flush with the walls. Don't worry about making drywall cracks forth the corner worse.

Photo 2: Apply record and compound
Cover the crack with mesh tape, then cover the tape and the corner bead with joint compound. Fill in one side, let it dry, and then fill up in the other side.
Metal corner bead dents hands, causing cracks in the wall. Fortunately, the fix is relatively uncomplicated likewise. Utilize a hammer to knock the dewdrop back into shape with several light taps instead of hard blows (Photo ane). Use a level to make certain the bead doesn't stick out past the finished walls or you won't become a clean corner (bury the bead in the wall a picayune if needed). Round whatsoever sharp edges on the bead with a file.
When you hitting the bead with a hammer, you lot probably sent cracks up and down the corner, specially if the bead wasn't taped. Place mesh record over the cracks, so apply joint compound over the record and corner bead on 1 side only (Photo two). Piece of work on ane side at a time—the beginning side needs to be hard and then y'all can square the other side. Once the first side is dry, utilize joint compound to the second side. Then recoat the corner, let it dry and sand it smooth.
Cut effectually glue spots

Cutting out old gum strips
Score the paper with a utility pocketknife, and then strip off the old glue.
Mirrors and paneling are sometimes installed with an agglutinative backing to aid hold them in identify. Only when you take them downwardly, the glue sticks to the drywall. Don't effort to pull information technology off—you lot'll tear the drywall face up, making rips across the wall. Instead, cut around the glue with a utility knife, cut through the drywall face.
Scrape off the glue with a putty knife. You'll still tear the newspaper, simply the tears will exist confined to the outline you cut in the drywall. Use 120-grit sandpaper on small areas of glue that won't scrape off. Make full gouges that you fabricated in the wall with articulation compound.
Fill up holes 3 times

Fill holes
Fill holes with filler or drywall compound. Allow to dry, then refill. Avert overfilling to minimize sanding.
Make full small holes and indents (less than 1/viii in.) with spackling compound. For larger holes, utilize joint compound instead.
Apply either compound with a putty pocketknife, spreading it thin on the wall. You lot'll use two more coats (the compounds shrink equally they dry), then don't worry if the hole isn't filled perfectly the first time. Let each coat of compound dry (read the directions; some dry in just ii hours).
Don't believe spackling labels that say you don't accept to sand—you do. You'll have to sand between coats if there's any backlog compound. Later the terminal coat, use fine-grit sandpaper.
Cutting out wall cracks
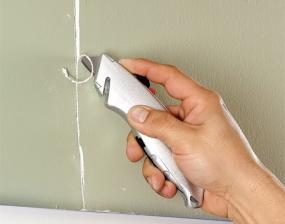
Photo ane: Cutting out loose fabric
Cut a V-shaped groove in the crevice, removing everything that's loose, even if it means cutting all the way through to the dorsum of the drywall.

Photo 2: Apply tape and chemical compound
Fill the groove with joint compound, embrace it with mesh tape, and then cover it with more compound.
When homes settle, drywall cracks sometimes shoot out above or beneath windows and higher up doors. Yous tin can't just cover or fill the cracks with joint compound—they'll come back. Instead, fix the cracks with joint compound and mesh tape. Mesh record gives you lot less buildup than newspaper tape and is enough strong. Protect the window or door trim with masking tape before starting the gear up.
To make full the crack, utilize a utility knife to cut a Five-shaped groove along its unabridged length (Photo one). Make full the groove with articulation compound, let it dry, so sand information technology flush with the wall. Place mesh tape over the scissure (Photograph two). Apply joint compound over the tape and plumage it out 2 to 4 in. on each side of the tape. Permit the compound dry, then utilise a second and third coat, feathering it out viii to 10 in. from the tape with a 10-in. taping bract.
Set up holes fast with an aluminum patch

Prepare the patch and employ compound
Cut the aluminum patch oversize, apply it and embrace information technology with at least two coats of drywall compound.
The old method of repairing big holes was to cut out a foursquare in the drywall, attach wood backing then screw on a new patch of drywall. Aluminum patches (at home centers) are a faster, easier solution of how to repair large drywall holes. Cut the patch so it covers the pigsty by at least one in. on each side, and then place information technology over the hole. One side is sticky to adhere to the wall. Cover the patch with joint compound. Let it dry overnight, so recoat.
Block stains with special primer

Prime number wall marks
Cover wall marks that you can't clean off with a special stain blocking primer.
Don't expect regular primer or paint to cover marking or crayon marks; they'll bleed through fifty-fifty several coats of pigment. The same goes for water stains. Get-go try to wash off the marker or crayon with a Mr. Make clean Magic Eraser (at abode centers) dipped in warm water. If that doesn't work, cover the marks with stainblocking primer (KILZ and B-I-N are two brands). Utilise the primer with a roller so the texture will match the residual of the wall. Buy a inexpensive dispensable roller and and then throw it away when yous're done.
Replace lifting tape

Photo 1: Cutting abroad loose tape
Cut away loose tape with a utility knife. Be ambitious and cut past where the tape has lifted away from the wall.

Photo ii: Add new tape
Place a strip of tape in joint compound a few inches past and straight over the patch. Apply articulation chemical compound over the top of the tape.
Tape volition lift off the wall if there isn't enough articulation chemical compound underneath to adhere it to the drywall. You'll have to cutting abroad the loose record and supercede it. Showtime past cutting through the paint and joint chemical compound to remove every piece of loose tape. Go across the cracked area. Peel away the tape until y'all see the underlying drywall (Photo 1). Then fill up the hole with articulation compound and expect for it to harden. Embed mesh or newspaper tape in joint chemical compound over the hole (Photo 2). Extend the record a few inches past the hole on each side. One time it'southward dry, apply a 2d coat and feather information technology to alloy the patch with the wall.
Required Tools for this Projection
Take the necessary tools for this DIY project lined up before you first—yous'll save time and frustration.
In addition, you'll demand a trouble calorie-free.
Required Materials for this Project
Avoid last-minute shopping trips by having all your materials ready ahead of time. Hither's a list.
Originally Published: January 28, 2022

How To Mach Paint On A Wall Repair,
Source: https://www.familyhandyman.com/project/preparing-walls-for-painting-problem-walls/
Posted by: kempimind1946.blogspot.com
0 Response to "How To Mach Paint On A Wall Repair"
Post a Comment